

Hair Extensions Shedding: What Wearers Need to Know
Some shedding is completely normal with hair extensions, but there are clear thresholds that separate routine hair release from a real problem. In the first week after installation, losing a small handful of strands per brushing session is within the expected range — those are manufacturing-loose hairs that were trapped in the weft during production and simply work free once the extensions are in place. What you should watch for are clusters of hair coming out together, visible gaps along the weft line, scalp pain or persistent irritation, or loss that continues at the same rate past day 10.
If you notice any of those signals, take these steps immediately:
- Stop aggressive brushing and switch to a wide-tooth comb or extension-safe brush, working from ends upward.
- Follow a gentle wash routine (sulfate-free shampoo, no conditioner at the roots).
- Book a stylist check if you see clustered loss, visible thinning, or scalp pain. If you suspect a product reaction, your stylist may also recommend consulting a healthcare provider before reapplying.
Normal, short-term shedding tapers off after day 7–10. Anything beyond that window, or any loss that comes out in patches, needs professional attention.
Key Takeaways
| Point | Details |
|---|---|
| Normal shedding threshold | 5–15 strands per brushing session in week one is expected; loss should taper by day 10. |
| Top care habits | Sulfate-free shampoo, conditioner at mid-length only, and a silk pillowcase at night reduce shedding significantly. |
| Lifespan by method | Tape-ins last 6–8 weeks; sew-ins 6–12 weeks; keratin bonds up to 3–6 months with maintenance. |
| When to see a pro | Clustered loss, visible weft gaps, scalp pain, or shedding past day 10 all warrant a stylist check. |
| Hairlockshairextensions | Offers human hair extensions across multiple methods with personalized consultations to match the right install to your hair’s condition. |
Table of Contents
- Why hair extensions shed: the most common causes
- How to tell normal shedding from a problem
- Practical daily habits that reduce shedding and extend extension life
- How long extensions last and when to remove them safely
- Signs your natural hair is being damaged and how to support regrowth
- The HairLocks condensed care sheet
- What 30 years of experience teaches you about shedding
- Premium extensions and expert care, right here at HairLocks
- Sources
- FAQ
Why hair extensions shed: the most common causes
Understanding why extensions lose hairs helps you pinpoint the source quickly rather than guessing.
Manufacturing and first-week release. Every weft contains some hairs that were cut and trapped during construction. Those strands have no root attachment and will shed in the first few days. This is not a defect — it is a predictable feature of how wefts are made.
Poor installation technique. Incorrect heat application, wrong section sizes, or poor placement near the scalp are among the most common reasons keratin and fusion bonds fail early. Overheated bonds become brittle; underheated ones never fully seal. Either way, the strand releases before its time.
Extension type and construction. Hand-tied wefts are sewn rather than machine-stitched, which means the weft edge is more secure but the individual strands still shed if the weft is cut between rows. Tape-ins can slip if the adhesive is compromised by oils or conditioner. Clip-ins shed the least because they are removed daily, so there is no prolonged friction or bond degradation. Micro-bead and nano-bead extensions shed when the bead loosens from natural hair growth or improper clamping.
Home-care habits. Overwashing dries out extension hair because, unlike your natural hair, extensions do not receive scalp oils to replenish moisture. Applying conditioner at the root softens the bond area and accelerates slippage. Rough brushing, especially on wet hair, puts direct tension on attachment points.
Styling and environmental factors. Excessive heat without a protectant dries and weakens the hair shaft, making individual strands more likely to snap at the bond. Chlorine and sweat break down adhesive bonds faster than normal wear. Chemical services — color, relaxers, perms — done too soon after installation can dissolve keratin bonds entirely.
Scalp and natural hair condition. If your natural hair is in a rapid shedding phase (postpartum, nutritional deficiency, or stress-related), those natural hairs releasing from the scalp can look like extension shedding. Chemically damaged or fine hair also provides less anchor strength, which means attachment points shift more easily.
How to tell normal shedding from a problem
Not every strand on your brush is cause for concern. Here is a practical way to read what you are seeing.
Normal shedding looks like:
- Individual strands, not clusters, coming out during brushing or washing.
- Higher loss in week one (up to 5–15 strands per session), tapering noticeably after day 7–10.
- No visible gaps, no exposed weft backing, and no pain at the attachment points.
- Total loss over the full service life staying well under 15% of installed strands.
Problem shedding looks like:
- Clusters of hair releasing together, especially near a bond or bead.
- Visible thinning along the weft line or empty bonds you can feel with your fingertips.
- Loss continuing at the same rate — or worsening — past day 10.
- Scalp redness, soreness, or persistent sensitivity at attachment sites.
Schedule a stylist check if shedding continues past ten days, occurs in clusters, or shows visible thinning along the weft line. That threshold is the clearest signal that something beyond normal manufacturing release is happening.
Pro Tip: Take a photo of your brush after each session in week one. It gives you a visual baseline so you can see whether loss is genuinely tapering or holding steady — far more reliable than memory alone.
Practical daily habits that reduce shedding and extend extension life
A consistent routine is the single most effective tool for keeping hair extensions shedding to a minimum.
The first 48–72 hours after installation
Wait at least 48–72 hours before washing tape-in or bonded extensions after installation. The bonds need time to fully set. During this window, avoid sweating heavily, swimming, or applying any product near the attachment points.
Weekly wash routine
- Detangle gently with an extension-safe brush before getting hair wet.
- Wet hair with lukewarm water — never hot, which loosens adhesive.
- Apply a sulfate-free shampoo in a downward motion; never scrub at the roots in a circular motion.
- Rinse thoroughly, then apply conditioner from mid-length to ends only.
- Pat dry with a microfiber towel; never rub or wring.
- Allow extensions to dry at least 80% before sleeping or tying hair up.
Washing a few times per week is typically sufficient. More frequent washing strips the extension hair of moisture it cannot replenish on its own.
Brushing and detangling
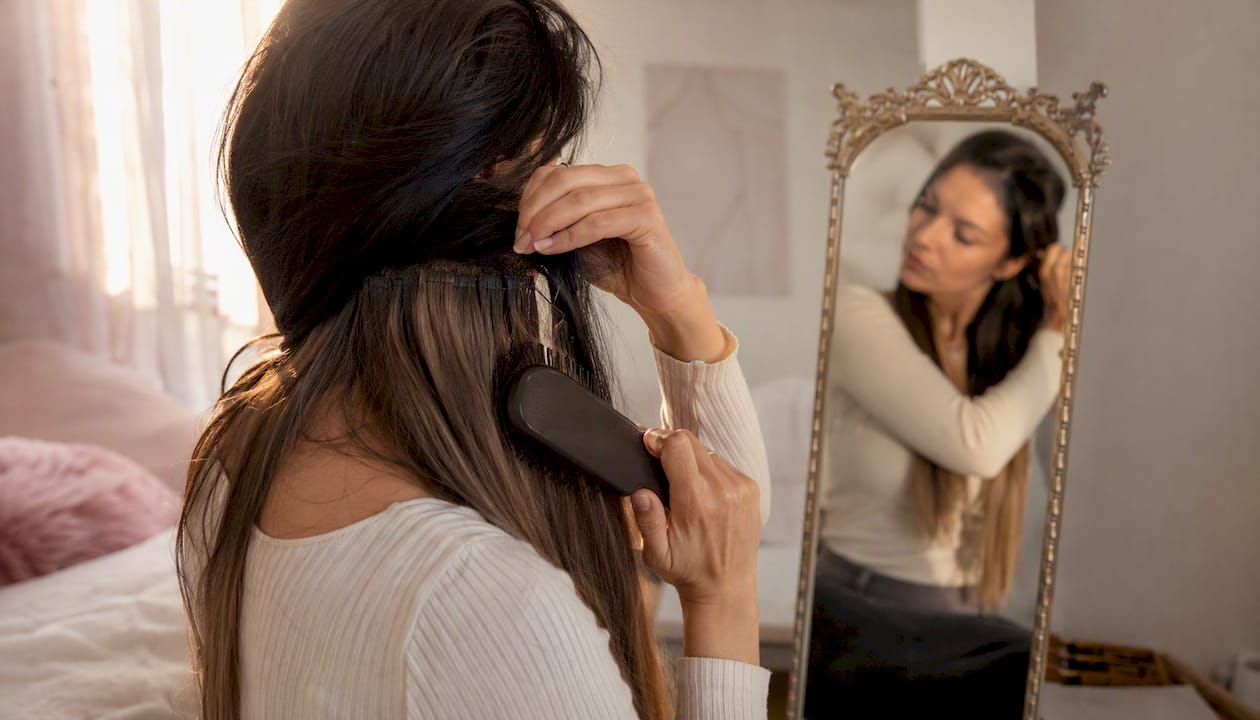
Start at the ends and work upward in short sections. Hold the hair above the point you are brushing to reduce tension on the bonds. A loop brush or a wide-tooth comb on wet hair causes significantly less mechanical stress than a standard paddle brush. Brush gently before bed and again in the morning.
Nightly protection
A silk or satin pillowcase reduces friction by roughly half compared to cotton. Pair it with a loose braid or low ponytail to prevent tangling overnight. Extension-friendly nightly protection — silk pillowcases, satin bonnets, and loose braids — consistently extends wear time and reduces the mechanical stress that causes bonds to loosen.
Product choices that matter
- Use sulfate-free, alcohol-free shampoos.
- Keep conditioner away from roots and bond areas.
- Apply a lightweight leave-in conditioner or serum to mid-lengths and ends.
- Use a heat protectant every time you style with heat above 300°F.
- Avoid heavy oils (argan, coconut) near tape or keratin bonds — they dissolve adhesive.
Type-specific tips
- Clip-ins: Remove every night. Store flat or on a hanger to prevent tangling.
- Tape-ins: Avoid oil-based products near the tape. Reapply every 6–8 weeks.
- Sew-in/weft: Keep the braid base clean and dry; buildup loosens the thread.
- Keratin bond: Limit direct heat to the bond itself when styling; use a heat shield.
- Micro-bead: Check bead tightness at regular maintenance appointments — loose beads shift and cause uneven tension.
Pro Tip: Stylists advise keeping conditioners and alcohol-heavy sprays away from adhesive bonds entirely. Even a small amount of conditioner at the root line can migrate to the tape or keratin bond within a few washes and accelerate slippage.
How long extensions last and when to remove them safely
Lifespan varies considerably by attachment method, and knowing the typical window for your type prevents you from wearing extensions past the point where they start causing damage.
| Attachment type | Typical wear window | Common replacement cue |
|---|---|---|
| Clip-in | Daily removal; indefinite with care | Visible weft fraying or clip loosening |
| Tape-in | 6–8 weeks per application | Adhesive lifting, slippage, or visible regrowth gap |
| Sew-in / weft | 6–12 weeks | Braid base loosening, matting, or scalp tension |
| Keratin / fusion bond | 3–6 months with maintenance | Bond slippage, matting near attachment, or natural growth gap |
| Micro-bead / nano-bead | 6–8 weeks before re-fitting | Bead sliding down the strand, visible gap at root |
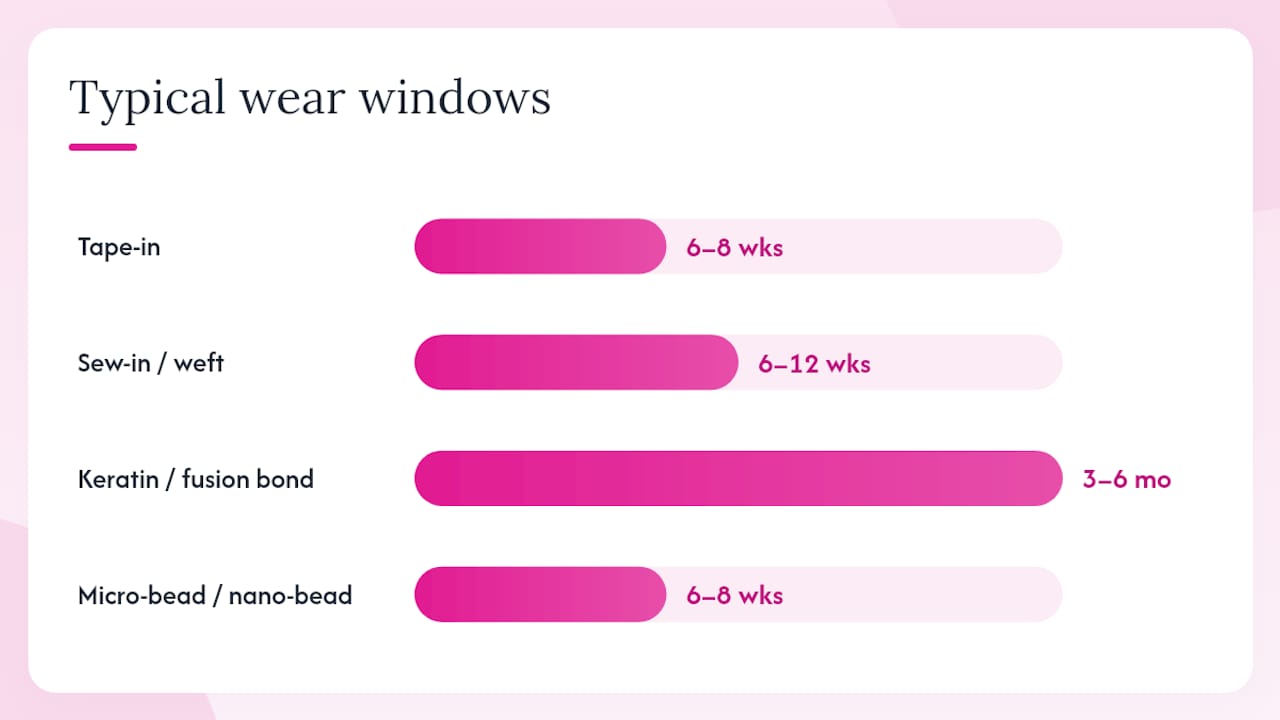
Stylists recommend routine maintenance check-ins every few weeks for most installed methods, and leaving microlinks or beads in too long can distort the fitting and create uneven tension on the natural hair. For detailed lifespan guidance by method, the HairLocks extension lifespan guide covers each attachment type in depth.
Safe removal rules:
- Never pull tape-in extensions off dry. A professional solvent releases the adhesive without tearing the natural hair.
- Keratin bonds require a bond remover applied at the attachment point before the bond is gently crushed and slid free. Improper keratin bond removal risks breakage and trauma to the natural hair.
- Micro-bead and sew-in extensions need the correct pliers or seam ripper — never scissors near the scalp.
- See a professional immediately if you experience pain, open sores, or rapid slippage at multiple points.
Signs your natural hair is being damaged and how to support regrowth
Extensions done well should not damage your natural hair. When they do, the signs appear at the attachment line first.
Watch for these damage signals:
- Thinning or breakage at the hairline or along the part where extensions attach.
- Short, broken hairs near bond sites that did not exist before installation.
- A widened parting or visible scalp where the hair used to be dense.
- Persistent scalp soreness, redness, or sensitivity that does not resolve between washes.
If you notice any of these, act quickly:
- Remove or loosen the extensions causing tension. Do not wait for a scheduled appointment.
- Switch to a lower-tension method or take a break from extensions entirely for 4–8 weeks.
- Pause all chemical and thermal services to give the hair shaft time to recover.
- Use a scalp-friendly, sulfate-free shampoo and a lightweight scalp serum to support the follicle environment.
- Review nutrition basics — adequate protein, iron, and biotin support hair growth cycles. A general practitioner can check for deficiencies if loss seems disproportionate.
- Consult a trichologist or dermatologist if you see sudden, rapid loss, persistent scalp inflammation, or signs that suggest an underlying alopecia condition. Extensions can mask early-stage traction alopecia, which is why early detection matters.
For guidance on choosing extensions suited to fragile or damaged hair, Hairlockshairextensions has a dedicated resource covering safer attachment options for compromised hair.
Regrowth after extension-related damage is possible in most cases, provided the follicle itself has not been permanently affected. The earlier you address tension and breakage, the better the recovery outcome.
The HairLocks condensed care sheet
This checklist reflects the core guidance from the HairLocks official care sheet — a practical reference you can follow from day one.
- Wash frequency: Two to three times per week maximum. More frequent washing dries extension hair and loosens bonds.
- Shampoo: Sulfate-free only. Apply in a downward, smoothing motion — never circular scrubbing at the root.
- Conditioner: Mid-length to ends only. Keep it away from bonds, beads, and tape.
- Drying: Pat dry, then blow-dry on a low or medium heat setting before sleeping. Never go to bed with wet extensions.
- Brushing: Extension-safe loop brush or wide-tooth comb. Start at ends, work upward. Brush before bed and in the morning.
- Nightly routine: Loose braid or low ponytail, silk or satin pillowcase.
- Products to avoid: Sulfates, alcohol-heavy sprays near bonds, heavy oils at the root line.
- Root checks: Check attachment points weekly for buildup, slippage, or sensitivity. Address any of these before the next wash.
- Temporary removal: If you notice increased shedding or scalp sensitivity that does not resolve within a few days, remove extensions temporarily and consult your stylist.
Pro Tip: The most common mistake Hairlockshairextensions sees in clients is applying conditioner too high on the hair shaft during the first few washes. It feels like good hair care — and it is, for natural hair — but near bonds and tape, it starts a slippage process that compounds with every wash.
What 30 years of experience teaches you about shedding
After three decades of installing and maintaining extensions, a pattern becomes clear: most clients who come in worried about shedding are experiencing something completely normal, and most clients who should come in sooner wait too long.
Small shedding in week one is not a failure of the product or the install. It is physics — loose hairs trapped during weft construction finally releasing. What matters is whether that loss tapers. When it does not, the cause is almost always one of three things: a care habit that is compromising the bonds, a tension issue from the install itself, or the natural hair going through its own shedding cycle. All three are manageable when caught early.
The installs that hold longest and shed least share two things: correct technique from the start, and a client who follows the care routine consistently. Neither factor alone is enough.
Premium extensions and expert care, right here at HairLocks
When shedding is minimal and your extensions look natural from day one, the difference usually comes down to the quality of the hair and the precision of the installation. That means correct heat, correct placement, and a care briefing tailored to your hair type before you leave the chair.

For clients experiencing thinning, the exclusive Top~Lock V-Part Topper offers discreet coverage without the tension of a full install. Every service includes a personalized consultation so the method chosen fits your natural hair’s current condition, not a one-size approach. View real client results in the before and after gallery, or book a consultation at Hairlockshairextensions to discuss which method gives you the longest wear and the least shedding for your hair type.
Sources
- How to Care for Hair Extensions: Washing, Styling & Maintenance Tips – Color Wow UK
- Why Do Hair Extensions Shed More During the First Week | Bombshell Extensions
- Why Are My Keratin Hair Extensions Falling Out?
- These Hair Extension Care Tips Will Help Yours Last Longer | Allure
FAQ
Is it normal for hair extensions to shed?
Yes. A small amount of shedding is normal, particularly in the first week, when manufacturing-loose hairs trapped in the weft work free. Expect roughly 5–15 strands per brushing session during that window, tapering noticeably after day 7–10.
How do you stop hair extensions from shedding?
Use a sulfate-free shampoo, keep conditioner away from bonds and roots, wait 48–72 hours after installation before the first wash, and brush gently from ends upward with an extension-safe tool. Consistent nightly protection with a silk pillowcase and a loose braid also reduces friction-related loss.
Will hair loss from extensions grow back?
In most cases, yes — provided the follicle has not been permanently damaged by prolonged tension. Removing the source of tension early, pausing chemical services, and supporting scalp health gives the best recovery outcome. Consult a dermatologist or trichologist if loss is rapid or accompanied by persistent scalp inflammation.
How often should hair extensions be replaced?
It depends on the attachment method. Tape-ins typically need reapplication every 6–8 weeks, sew-ins every 6–12 weeks, and keratin or fusion bonds can last up to 3–6 months with proper maintenance and regular stylist check-ins.
Recommended
- Professional Hair Extensions Gold Coast: The Ultimate Guide to Luxury – HairLocks Hair Extensions
- Extension Friendly Hair Products: Your 2026 Australia Guide – HairLocks Hair Extensions
- Keratin Bond Removal: Safe Steps for Healthy Hair – HairLocks Hair Extensions
- CARE SHEET – HairLocks Hair Extensions