


I-Tip vs U-Tip: Which Extension Method Fits Your Hair?
If your hair is fine, color-treated, or heat-sensitive, I-tip extensions are usually the better fit because the beads clamp on cold, with no heat near your scalp. If you want a longer stretch between salon visits and don’t mind fewer touch-ups, U-tip often wins because the keratin bond fuses flat and holds for months at a time. The technical reason comes down to attachment: I-tip relies on a micro-bead and crimping method that skips heat entirely, while U-tip uses a keratin-coated tip that a heated tool melts and fuses directly to your natural hair.
Here’s where to look for more detail:
- Want the construction and comfort breakdown? Jump to the sections on how each tip is built.
- Trying to weigh cost against maintenance? The side-by-side comparison and installation timeline sections cover that directly.
Key Takeaways
The choice between I-tip and U-tip comes down to your hair’s tolerance for heat, your appetite for frequent salon visits, and how much you value reusable hair over long stretches of low-maintenance wear.
| Point | Details |
|---|---|
| I-tip fits fine or treated hair | Cold-fusion beads avoid heat exposure, making it a safer choice for fragile or color-processed hair. |
| U-tip suits low-maintenance wear | Hot-fusion bonds hold for months and create a flatter, more discreet finish for updos. |
| Maintenance cadence differs sharply | I-tip needs move-ups every 6 to 8 weeks; U-tip typically lasts 4 to 6 months per install. |
| Reuse favors I-tip, longevity favors U-tip | I-tip hair is often reusable; U-tip hair usually needs re-tipping after removal. |
| Placement skill matters as much as tip type | Bond size and even distribution, not the method alone, drive comfort and invisibility. |
| Hairlockshairextensions offers guided selection | Michele’s 30 years of experience and personalized consultations help match the right tip to your hair. |
Table of Contents
- What Are I-Tip Extensions? Construction and Practical Effects
- What Are U-Tip Extensions? Construction and Practical Effects
- I-Tip vs U-Tip: A Side-by-Side Comparison
- How to Choose the Right Tip for Your Hair and Routine
- What to Expect: Installation, Care, and Removal
- Why a Professional Fitting Changes the Outcome
- Our Take on Choosing Between I-Tip and U-Tip
- Find Your Fit With Hairlockshairextensions
- Sources
- FAQ
What Are I-Tip Extensions? Construction and Practical Effects
I-tip extensions get their name from the straight, cylindrical shape of the tip, which a stylist threads through a small section of your natural hair using a bead. The bead is then crimped shut with a specialized tool, no heat involved. This is why the method is often called cold fusion: the strand locks in place mechanically rather than being melted onto your hair.
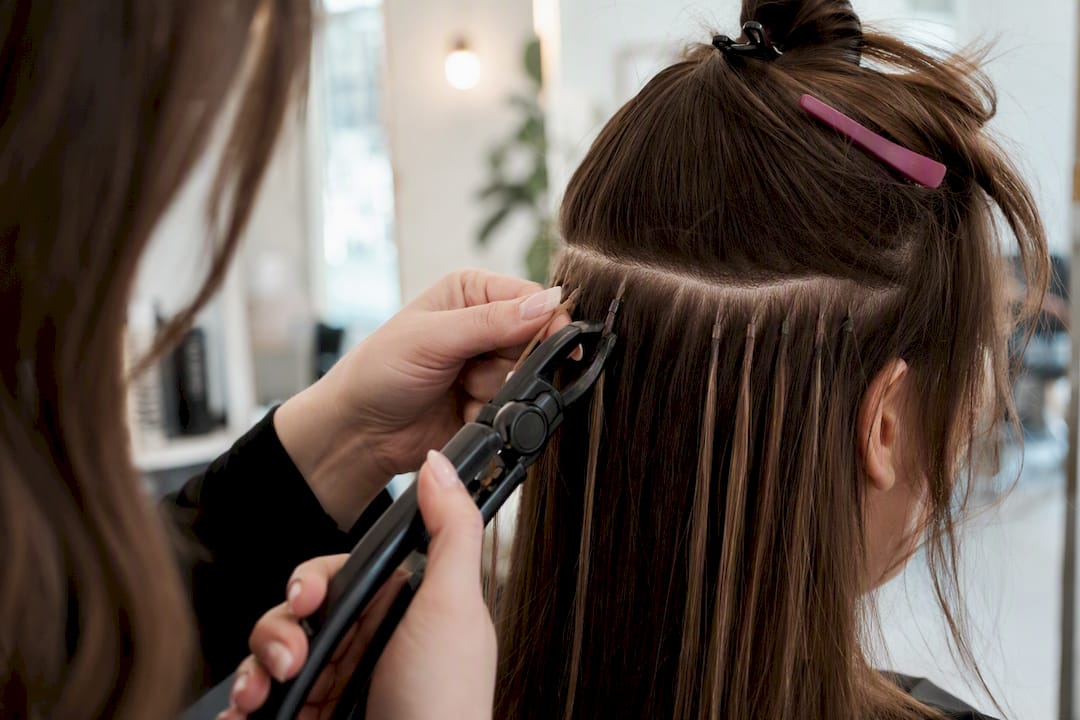
That distinction changes what the extensions can do for you. Because there’s no thermal exposure at the root, I-tip is frequently recommended for fine, chemically processed, or heat-sensitive hair, where repeated heat could weaken strands already under stress from color or keratin treatments elsewhere. It’s also one of the few bonded methods where the hair itself is commonly reusable across multiple installs, since removal doesn’t involve melting or cutting the tip.
A few things determine how well I-tip performs in practice:
- Bead size matters more than people expect. A bead sized to your natural hair density sits flat and comfortable; an oversized bead is what causes the itching and visibility complaints you’ll read about online.
- Move-ups happen on a schedule. As your hair grows, the bead moves away from your scalp and needs repositioning, typically every 6 to 8 weeks for a full-head install.
- Reuse depends on gentle removal. A stylist who uses the correct removal pliers, rather than yanking or cutting, preserves the extension hair for a second or third install.
- Placement technique separates a good result from a mediocre one. Even strand distribution across the head prevents pressure points and visible partings.
I-tip isn’t automatically the right call for every head of hair. If you need very heavy density added quickly, the bead-by-bead process takes longer than other methods, and improperly sized or placed beads can slip or tug regardless of how gentle the cold-fusion process is on paper.
Pro Tip: Ask your stylist to show you the bead size before your install starts. A bead that looks smaller than a grain of rice is generally a sign of careful, low-visibility work.
What Are U-Tip Extensions? Construction and Practical Effects
U-tip extensions, sometimes called nail-tip or hot-fusion, use a keratin-coated tip shaped like a small U. A stylist applies a heated tool to melt that keratin and fuse it directly around a section of your natural hair, creating a bond as it cools. The result is a flat, secure attachment point that sits close to the scalp.
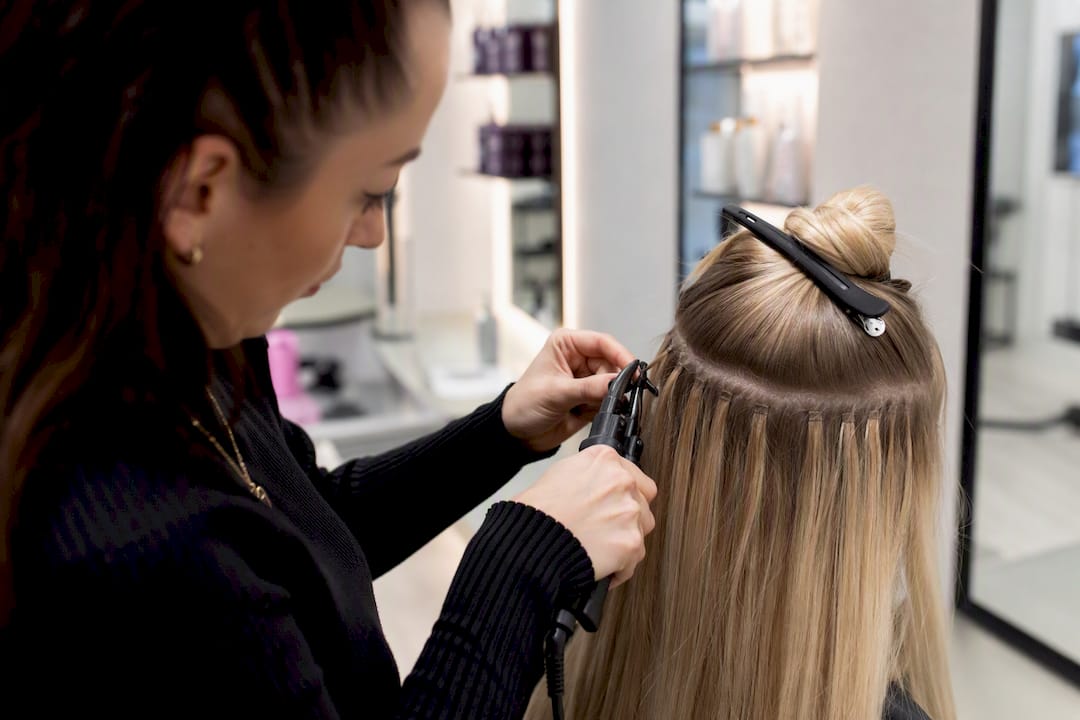
That flatness is the whole appeal. A well-installed U-tip bond is hard to detect even when your hair is pulled into a ponytail or updo, which is why it’s popular with people who wear their hair up often or simply want fewer things to think about between salon visits. Per-install wear tends to run longer than I-tip, often stretching several months before the bond needs attention.
The trade-off shows up at removal. Because the keratin has fused and hardened, taking U-tip extensions out usually means applying a solvent to soften the bond before it’s gently broken apart. That process typically damages the tip beyond reuse, so:
- Budget for re-tipping, not reuse. If you want to keep the same extension hair for a future install, expect to pay for the hair to be re-tipped with fresh keratin.
- Heat control is a skill, not a setting. A tool held too hot or too long can scorch natural hair at the bond site, which is why technique matters as much as the method itself.
- Bond size still governs comfort. Even with a secure hot-fusion bond, an oversized or poorly shaped tip will feel heavy and pull at the root.
- Removal should never be rushed. Solvent needs time to work; forcing a bond apart early risks pulling out natural strands with it.
U-tip is generally a poor match for hair that’s already fragile, over-processed, or exposed to frequent heat styling. Repeated hot-fusion applications on compromised hair compound stress at the same attachment points, which is a real consideration if you color or heat-style aggressively between installs.
I-Tip vs U-Tip: A Side-by-Side Comparison
The honest answer to “which is better” depends on what you’re optimizing for: less heat exposure, longer stretches between appointments, or lower cost per year. Here’s how the two stack up across the factors that actually affect your daily experience.
- Heat exposure: I-tip uses no heat at the bond; U-tip requires a heated tool to fuse the keratin. If your hair is already heat-fatigued from styling or color, that difference alone can be the deciding factor.
- Longevity per install: U-tip commonly holds for several months before it needs redoing, while I-tip needs a move-up roughly every 6 to 8 weeks as your natural hair grows.
- Reusability: I-tip hair is often reusable across multiple installs since removal doesn’t melt the tip; U-tip tips are generally not reusable and typically need re-tipping.
- Best hair types: Fine, color-treated, or heat-sensitive hair tends to do better with I-tip; thicker or more resilient hair can usually handle U-tip’s hot-fusion process without issue.
- Maintenance cadence: I-tip means more frequent, shorter salon visits; U-tip means fewer visits that each take longer.
- Comfort and invisibility: Both can look seamless when installed well, but U-tip’s flat bond has a slight edge for updos and high ponytails.
One insight worth sitting with: the economic comparison isn’t as lopsided as it looks on paper. I-tip’s reusability can offset its more frequent move-up appointments, while U-tip’s fewer visits are partly balanced out by the cost of re-tipping hair you want to reuse later. Run the numbers over a full year, not a single install, before deciding purely on price.
How to Choose the Right Tip for Your Hair and Routine
Start with a plain assessment of your own hair and habits before you compare methods on paper. Ask yourself: Is your hair fine or already color-processed? Do you style with heat daily, or rarely? Can you commit to a salon visit every 6 to 8 weeks, or do you need something that holds for months with minimal upkeep? Your answers point toward I-tip or U-tip faster than any generic pros-and-cons list.
Once you’re in a consultation, come prepared with specific questions rather than general ones:
- What bead or bond size will you use, and can I see a sample before we start?
- How many strands will go into each attachment point?
- What’s the realistic maintenance schedule for my hair density and growth rate?
- What does the removal process look like, and will the hair be reusable afterward?
- What grade of hair are you using, and where does it come from?
Watch for red flags during this conversation. A price that seems unusually low for what’s marketed as premium human hair is worth questioning directly, and so is a stylist who pushes a specific removal product without explaining why it’s necessary for your hair type. If your stylist is confident in the method, they should be equally confident walking you through the reasoning.
Pro Tip: Request a small test section, sometimes called a strand-pull check, before committing to a full head. It shows you exactly how the bond feels against your scalp and how it holds up to gentle tension.
What to Expect: Installation, Care, and Removal
A full-head install of either method typically takes 3 to 5 hours, depending on how much hair you’re adding and how closely the color needs to be matched. Denser installs and complex color blending both add time, so budget accordingly if you’re going from a shorter style to significant length.
- I-tip needs a move-up appointment roughly every 6 to 8 weeks as your natural hair grows past the bead.
- U-tip installs commonly last 4 to 6 months before the bond needs to be redone.
- I-tip hair can often be reused at your next appointment if removal was gentle; U-tip hair usually needs re-tipping first.
- At home, avoid heavy oils and silicone-based products near the bonds, since buildup can cause slippage. Braiding your hair loosely before bed also reduces friction and matting overnight.
Cost ranges vary by salon, hair grade, and stylist experience, and generally rise with higher-grade human hair and more senior stylists. Factor lifespan into your cost comparison rather than just the sticker price of the first install; see our guide on hair extension lifespan for a fuller breakdown of what affects how long extensions actually last.
Why a Professional Fitting Changes the Outcome
A trained eye catches what a DIY install or a rushed salon visit often misses: the right bond size for your specific hair density, the placement pattern that avoids pressure points, and the color match that makes extensions disappear into your natural hair rather than sit on top of it. Michele, the founder of Hairlockshairextensions, brings 30 years of experience to exactly this kind of assessment, and that depth of practice is what separates a comfortable, natural-looking result from one that needs constant adjustment.
A professional consultation typically covers:
- Hair type and density assessment to recommend I-tip, U-tip, or an alternative like micro-bead
- Personalized color matching so extensions blend seamlessly with your natural shade
- Guidance on the Top~Lock V-Part Topper for thinning hair, when bonded extensions aren’t the right solution
- A realistic maintenance plan built around your actual hair growth and styling habits
Our Take on Choosing Between I-Tip and U-Tip
The conventional advice treats this as a binary choice: pick I-tip for gentleness or U-tip for longevity, as if the tip shape alone decides your outcome. It doesn’t. Placement, bond sizing, and strand distribution consistently make a bigger difference to comfort and how natural extensions look than which method you chose in the first place. Two people can get the same tip type and walk away with completely different experiences based purely on how carefully it was applied.
Where most guides fall short is treating cost as a single upfront number. The real comparison is annual: I-tip’s frequent move-ups against U-tip’s re-tipping fees can land closer together than either method’s marketing suggests. What we’d prioritize first isn’t the tip shape at all. It’s finding a stylist who will actually walk you through bead size, strand count, and removal method before touching your hair. Get that conversation right, and the tip choice becomes the easy part.
— HairLocks
Find Your Fit With Hairlockshairextensions
Choosing between I-tip and U-tip gets a lot less confusing when you’re working from a real assessment of your hair, not a generic comparison chart. Hairlockshairextensions built its consultation process around exactly that: Michele’s 30 years of hands-on experience means your bead size, bond placement, and color match get decided based on your actual hair, not a one-size-fits-all script.
Beyond bonded methods, Hairlockshairextensions carries micro-bead extensions for readers leaning toward the cold-fusion side of this comparison, plus keratin bond services, weft options, and the signature Top~Lock V-Part Topper for thinning hair where bonded extensions aren’t the answer. A free personal color matching service is included with every consultation, which removes one of the biggest risks in any extension install: a mismatched blend that looks obvious rather than seamless.
If you’re ready to move past comparison charts and get a recommendation specific to your hair, book a consultation and bring your questions about bead size, maintenance schedule, and removal method. That’s the conversation that actually determines your results.
Sources
- I-Tip vs U-Tip Hair Extensions: What’s the Real Difference? – CoovipHair
- I-Tip vs K-Tip Extensions: Master Stylist’s Honest Guide
- What Are I-Tip Extensions? I-Tip vs U-Tip Compared - Reign Hair Extensions
- I Tip vs U Tip Hair Extensions: The Ultimate Comparison Guide (2026)
Always confirm details with a certified stylist during a personal consultation, since hair condition varies enough that generic advice only goes so far.
FAQ
What Is the Difference Between I-Tip and U-Tip Extensions?
I-tip uses a bead and cold-fusion crimping method with no heat, while U-tip uses a keratin tip that’s melted onto your natural hair with a heated tool, producing a flatter but generally non-reusable bond.
Are I-Tips Damaging to Hair?
I-tip is often considered gentler than heat-based methods because it skips thermal exposure at the root, though poor bead placement or oversized beads can still cause tension and breakage regardless of the method.
Which Is Better, K-Tips or I-Tips?
Neither is universally better. K-tip and I-tip both avoid heat, but they differ slightly in bond construction, and the better choice depends on your hair density, growth pattern, and how your stylist handles placement.
Which Extensions Do Celebrities Typically Use?
Celebrity extension choices aren’t publicly documented in a way that supports a reliable answer, and the method that actually works for you depends far more on your own hair type and stylist’s skill than on any celebrity trend.
Can I Reuse I-Tip or U-Tip Extension Hair?
I-tip hair is often reusable across multiple installs since removal doesn’t melt the tip, while U-tip hair usually needs re-tipping with fresh keratin before it can be reinstalled.
Recommended
- Least Damaging Hair Extensions: Safest Methods Ranked – HairLocks Hair Extensions
- Best Extensions for Short Hair in Australia 2026 – HairLocks Hair Extensions
- Best Extensions for Fine Hair: Safe Methods That Work – HairLocks Hair Extensions
- Weft Extensions Pros and Cons: What You Need to Know – HairLocks Hair Extensions